In this article, I’m going to introduce a way of designing the user management system. I will represent those models by diagram or Prisma models.
Introduction to the eTOM Model
The classic eTOM model(Enhanced Telecom Operation Map) is a classic business process framework that is used widely by telecom service providers as an account manager system. This model describes some required business processes for the telecom business provides. Within all of its design ideas, I think its account system hierarchy model matches our exact needs. So I would like to introduce it and give a briefly implementation plan over this model.
The Common Requirements for A User Account Management System
The original eTOM model has 5 levels, but we only need 3 levels out of its original 5 levels to fulfill a user account management system. Currently for our universal account system we will need the following features.
- Easy Migration over Current Account System Without Losing Any Data
- An Universal Account System with Extensibility over Permission Control that Fits Any User Roles.
- The Flexibility in User Relations and Permission, For Example, An Account Can Have Multi Roles and Different Permissions Granted For Each Role.
A Detailed Look at the Three Levels eTOM Account Model
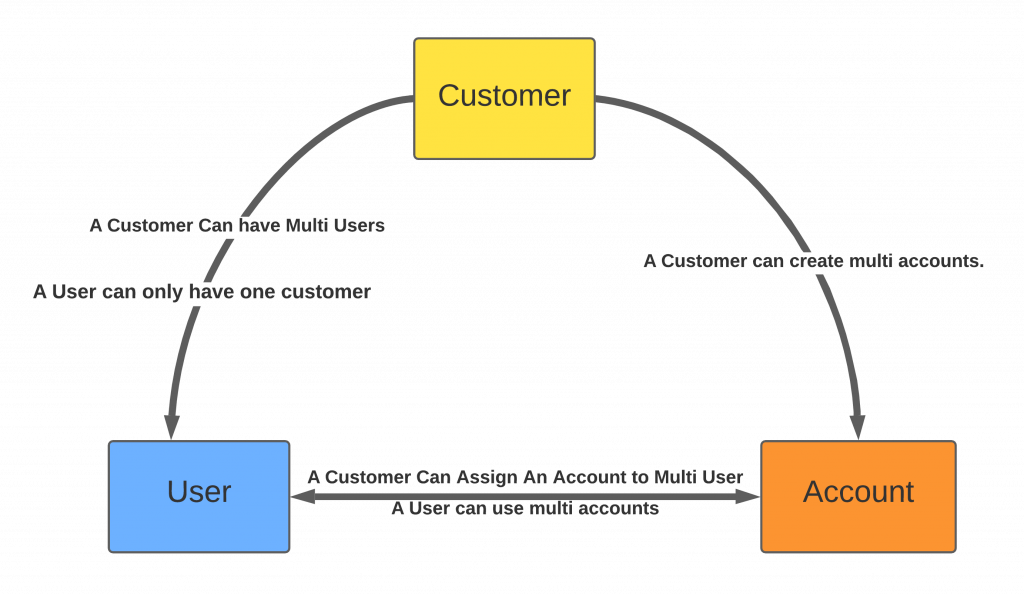
First, let’s take a look at what the classic eTOM account model looks like. The three levels here means the customer, user, and account. In the eTOM model, these are just abstract concepts.
- Customer: The highest level in this model. It points to an organization or entity.
- User: This is the most interactive level among the eTOM model. This is the level that primary interact with the system.
- Account: This is the lowest level in the eTOM model. In the eTOM concept, this is more like a virtual level that belongs to the user level.
Classic eTOM Model Diagram
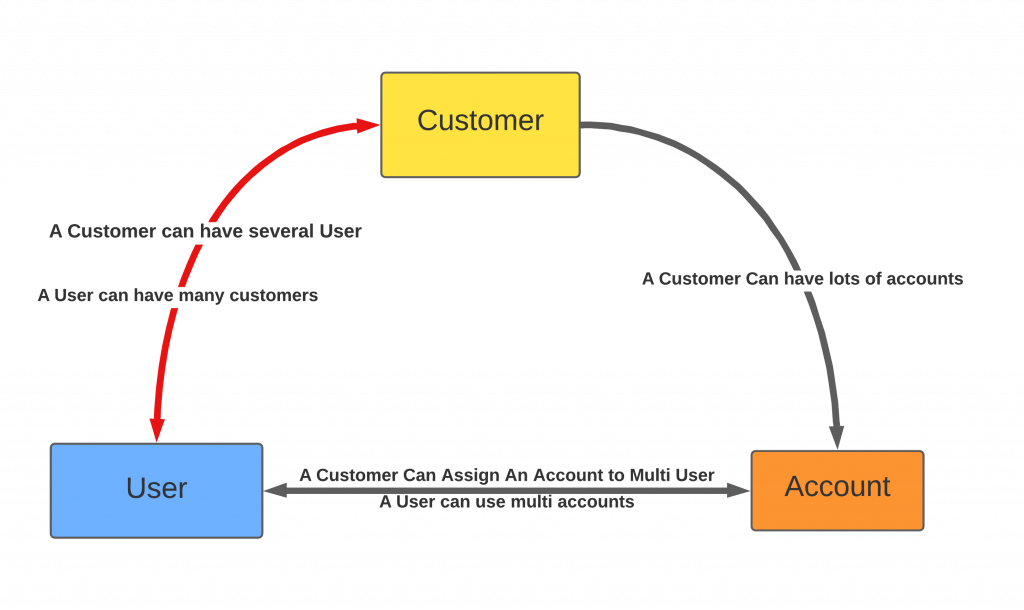
The above diagram is the classic eTOM account model that fits the telegram industry. Let’s convert it into our own use case. See the below reorganized diagram.
Adjusted eTOM Model Diagram
In the original eTOM model, the customer to user is a many to one relationship: A customer can have multi users, but for a user, it only belongs one customer. That is not corrected in our case, a user might have multi customer even at the same time. Thus, I modified the relationship into a many-to-many relationship. However, we will be have trouble applying this model directly into our database. That because, for the original eTOM model, this model is implemented by multi level account system which means there are three separated accounts system exists at the same time. Here we will need to combine the three account system into one.
A example of eTOM user management system under healthcare industry
In the example implementation below, I’m going to adapt it into a healthcare setting where Clinic will be the same as the company/organization setting, and the doctor will be the same as the user concept in the eTOM model, and patient is just like the account level in the eTOM model.
I already made a simple and classic user model class, just like any other account user system, it has username, password and contains basic user information. The original idea behind it is to implement a binary code that represents its user group and permission. But I think this is not very flexible and cannot easily show the relationship between users. For example, we know an account is customer level, but which customer is it, and maybe some customer have more permission over others. In this case, we might need to create a clinic level 2 for it. Below is the current user model code:
model user {
  user_id                          Int     @id @unique @default(autoincrement())
  username                         String  @unique
  password                         String
  twoFactorAuthenticationSecret    String?
  isTwoFactorAuthenticationEnabled Boolean @default(false)
  //Below Will be replace with a binary field in the future
  isUserInLabGroup                 Boolean @default(false)
  isUserInAdminGroup               Boolean @default(false)
  isUserInBillingGroup             Boolean @default(false)
  isUserInSupportGroup             Boolean @default(false)
  isUserInITGroup                  Boolean @default(false)
  isUserInShippingGroup            Boolean @default(false)
  isUserInDoctorGroup            Boolean @default(false)
  //Some User Information
  ...
}
The Idea of Virtual User
For the eTOM model, we now know that the original eTOM account system is for multi level account system. From higher ones to lower ones, the lower ones are more like a kind of extension over the higher ones. So, is there a way to turn this kind of level system into a simple model? And it’s clearly that a tree structure can represent this easily. So, here is my improved version on the user model.
model user {
  user_id                          Int     @id @unique @default(autoincrement())
  username                         String  @unique
  password                         String
  twoFactorAuthenticationSecret    String?
  isTwoFactorAuthenticationEnabled Boolean @default(false)

  // A Tree Like Struction
  node_id                          Int?
  leaf_id                          Int?
  node                             user?@relation("Tree", fields: [node_id], references: [user_id])
  leaf                             user?@relation("Tree")
  level                            String
  //Some User Information
  ...
}
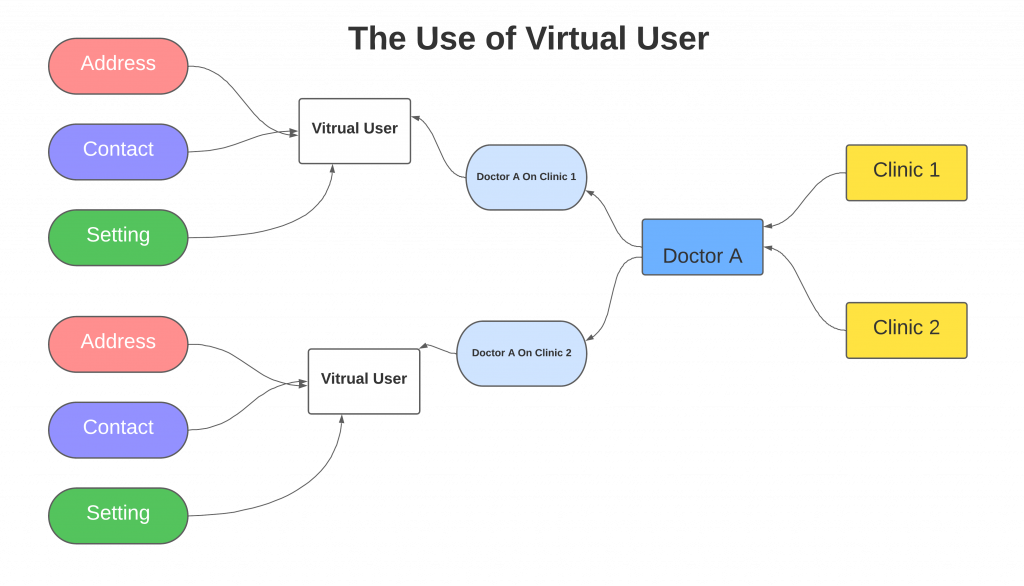
Seems good, despite the self-relations might need to rework to reflect (many to many or one to many), we added two self-relations: node and leaf. But it does not solve the problem perfectly. We want to reflect that a user can have very different setting under different situations. For example, If I am a Doctor at Clinic A, Doctor Lee might have a phone number of 999-9999-9999, but in Clinic B, I will have a phone number of 111-1111-1111. In this case, we can treat Doctor Lee at Clinic A and Doctor Lee at Clinic B as two different users even if Doctor Lee is login to our system using the same account.
The below diagram shows the idea about the virtual user.
Now, we can implement the clinic, patients and doctors models in our database to continue our database design. Below are the clinic and doctor model for this example:
model clinic {
  clinic_id              Int                     @id @unique @default(autoincrement())
  clinic_name            String
  isActive               Boolean                 @default(true)
  clinic_address_group   address_group?
  clinic_contact_group   contact_group?
  clinic_reference_range reference_range_group[]
  clinic_address         address[]
  clinic_contact         contact[]
  customers              customer[]
  clinic_setting_group   setting_group[]
  clinic_setting_value   setting_value[]
}

model doctor {
  doctor_id                    Int                     @id @unique @default(autoincrement())
  doctor_first_name            String?
  doctor_last_name             String?
  doctor_middle_name           String?
  doctor_type_id               String?
  doctor_suffix                String?
  payment_method                 String?
  sales_id                       Int?
  isActive                       Boolean                 @default(true)
  doctor_address_group         address_group?
  doctor_contact_group         contact_group?
  orders                         order_info[]
  clinics                        clinic[]
  patients                       patient[]
  doctor_setting_group         setting_group[]
}
From the models, we can notice the many-to-many Clinic to Doctor and the Clinic to Patient relationship that I want to achieve in the adjust eTOM diagram has been already implemented. What we need to do is just to link the user to those models. Let’s see the below model:
model user {
  user_id                          Int     @id @unique @default(autoincrement())
  username                         String  @unique
  password                         String
  twoFactorAuthenticationSecret    String?
  isTwoFactorAuthenticationEnabled Boolean @default(false)

  // level:current user level-For example: "Patient", "Doctor","Clinic"
  level                            String
  // The list of ids of upper level users, use of self_relation
  upperlevel_users                 User[] @relation("UserRelation",reference:[user_id])
  lowerlever_users                 User[] @relation("UserRelation",reference:[user_id])
  //Some User Information
  ...
}
Since our account levels are fixed, we can represent it like below user model.
model user {
  user_id                          Int     @id @unique @default(autoincrement())
  username                         String  @unique
  password                         String
  twoFactorAuthenticationSecret    String?
  isTwoFactorAuthenticationEnabled Boolean @default(false)

  // level:current user level-For example: "Patient", "Doctor","Clinic"
  level                            String
  // The list of ids of upper level users, information models,(If other models are needed)
  clinics                          clinics[]
  customers                        customers[]
  //Sales-----Single Level Model
  sales                            sales[]
  //Some User Information
  ...
}
Right now, the relations are much more clearer. Since the patients level is the lowest level. If the level is patients and the clinic[] is null and there will be doctor[] that holds the patient(we can get the clinic for patient via the patient model here).There is no need to connect to patient model(there is no lower model than patient in the account system. So what about the extensibility? For example, right now for some other special model levels like sales, what if there are some other special accounts like blood_center? Let’s modify the sales model into a model called base_model and then we have:
model user {
  user_id                          Int     @id @unique @default(autoincrement())
  username                         String  @unique
  password                         String
  twoFactorAuthenticationSecret    String?
  isTwoFactorAuthenticationEnabled Boolean @default(false)

  // level:current user level-For example: "Patient", "Doctor","Clinic"
  level                            String
  // The list of ids of upper level users
  clinics                          clinics[]
  customers                        customers[]
  //Sales-----Single Level Model
  base_model                       base_model[]
  //Some User Information
  ...
}
For model base_model[](used to be sales)
model base_model {
  id            Int             @id @unique @default(autoincrement())
  firstname     String
  lastname      String
  isActive      Boolean         @default(true)
  address_group address_group?
  contact_group contact_group?
  address       address[]
  contact       contact[]
  setting_group setting_group[]
  setting_value setting_value[]

  type          String? @default("Sales")
  relation_to   String? @default("Doctor?")
  relation_id   String? @default("[1,2,3,4,5,6]")
}
We can represent the sales and other single level models as a plain model. And if it happens to have some relations we can used two strings here to connect instead of foreign keys(which cannot be added without model change). And since this is less likely to have a complex relation, the speed should not be a problem.(Of course, we will keep the sales model since it need some other functions, but we can have this. base model as plus.
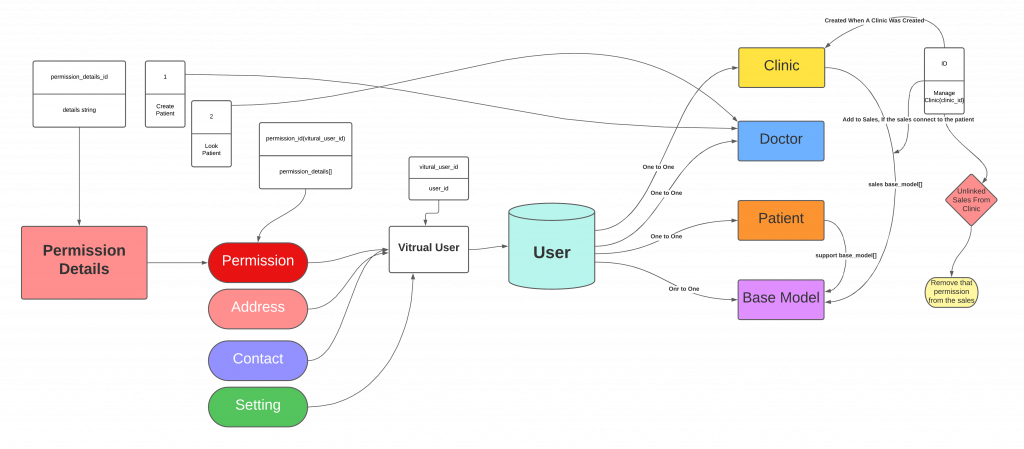
After that our models will be like the below diagram:
Now, We Have Relations, What About Permissions?
In general, permission is just the same as the phone number I mentioned in the virtual user part of this article. We can implement it in a similar way like the below diagram:
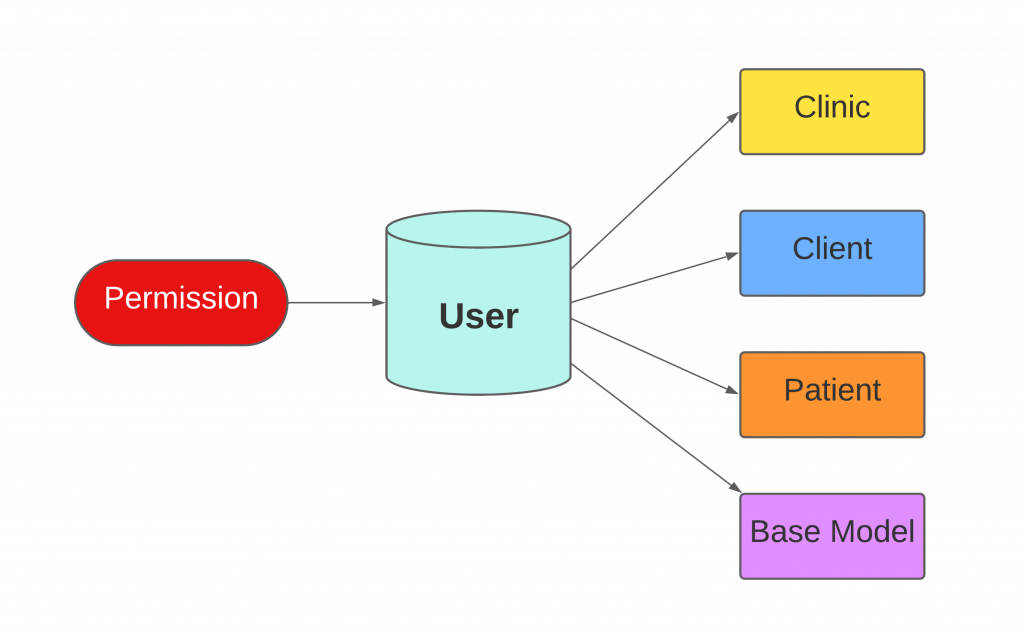
For permission, we just need a simple model with two columns. See the model here:
model permissions {
  id            Int             @id @unique @default(autoincrement())
  permissions   String // For example, ['create_patient','delete_patient']
}
To reduce the string length, we can replace the create_patient with ‘1’ and store the information somewhere else.
And then, we can do the connection here. See the diagram below:
We just need to add a one to one relation between the user and the clinic. But this still not solve a problem: A doctor is likely to have different permission under different clinics. So, let’s make our permission model this way:
model permissions {
  id               Int             @id @unique @default(autoincrement())
  permissions      String
  //Newly Added
  permission_index Int64
  user_id          Int
  user             User           @relation(fields: [user_id], references: [user_id])
  }
Let’s make it into a three column by adding a permission_index. And here are the rules:
- If a user is on its own, does not have upper level models:
- permission_index = it’s own id
- If a user has upper level models, for each upper permission:
- permission_index = it’s own id + the upper level id
- If a user has lower level models(haven’t added to user, but can be done by going the relationships using the linked model), for each lower permission:
- permission_index = it’s own id – the lower level id (to prevent the lower level has the same id as the upper).
Since this is easily revertible using the permission_index and the levels we can easily know what this permission is on too.
Permission Change History
As for the permission change history, I will implement this at the permission change api. I will send the log over Fluentd. And from there, it can be stored into any log database. And we can have a tag for it and store this kind of information in a special database.